Bethsoft Tutorial Non-NPC population
My First Dungeon: Non-NPC Population[edit | edit source]
While populating your level with enemies, you should also consider objects like locked doors, traps and terminals.
When designing levels, it's important to break up the flow of gameplay with events other than combat with NPCs and creatures. These alternative gameplay devices aren't just invaluable pacing tools; they also give consequence to the choices players make when distributing points into non-combat skills such as science or lockpicking.
Locked Doors and Containers[edit | edit source]

Locking doors and containers is very straightforward. Double-click on the object you'd like to lock to bring up its Reference Properties window. Doors and Containers have a special "Lock" tab, and all you have to do is click on this tab and set the lock value for the reference.
In the screenshot to the right, the door's lock is set to easy. Note that players in Fallout 3 will be unable to attempt picking any lock unless their lockpicking skills is greater than or equal to the skill required to pick, as listed in this table:
| Lock Level | Skill to Pick |
| Very Easy | 0 |
| Easy | 25 |
| Average | 50 |
| Hard | 75 |
| Very Hard | 100 |
| Requires Key | N/A |
When setting a lock to "Requires Key", be sure to specify a key to open this lock, otherwise there will be no way a player can ever open the lock. (Unless the player enters the developer console in game (by pressing "~"), highlights the specific door, and types 'unlock' [enter].)
The "leveled" checkbox in the lock tab is a deprecated feature: leave it unchecked.
The "Inaccessible" checkbox is unique to doors. This marks the door as one that cannot ever be opened, and is not encouraged for general use. Try to only use doors where they can be functional, and find other ways to block dead-ends.
While it's a good technique to lock short cuts, loot closets, or high-value containers like safes to hard or very hard, you generally want to minimize locking doors along the main path. Not everyone has a high lockpick or science skill, and you don't want to prevent those players from being able to go through the main part of your area. Reward players for having high skills, but avoid penalizing players for having low skills; there is a difference!
Traps[edit | edit source]
Traps Tutorial Video at YouTube
Raiders are the most notorious trap-setters of Fallout 3, so let's look into how to place some of these nefarious devices in Vault 74. Traps are located in the Object Window under World Objects> Activators> Traps, as shown in fig 1a.
Using WarehouseTraps Cell to Copy/Paste Traps[edit | edit source]
The easiest way to place traps is to go to a special interior cell called "WarehouseTraps" and select the trap you want to use. This cell is also a good place to familiarize yourself with the traps available and how they work.
For this example, let's use the grenade trap and tripwire trigger pictured in fig 1b.
Most traps are connected to other activators, such as tripwires. This relationship will appear as a line between the trap and the trigger that sets the trap off. Select both the trap and the trigger (hold ctrl and click on each object), and then ctrl+c to copy the trap and activator.
Load the cell into which you want to place your copied trap. Press ctrl+v to paste. The relationship between these two new objects will be preserved. That means that hitting the pasted tripwire will set off the pasted grenade trap.
For a more detailed look at traps, follow this link.
If you want a pressure plate instead of a tripwire, you can copy a setup from WarehouseTraps, paste in your cell, press "d" to deselect, and then select the tripwire. Then press ctrl+f to swap the TrapTripwire01 object for a TrapPressurePlate object. The activation setup will remain.
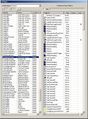
Fig 1a: Finding WarehouseTraps in the Cell View window
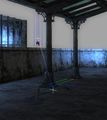
Fig 1b: Ctrl+Click to select two connected traps; note the connecting line
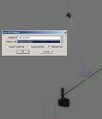
Fig 1c: Using Search and Replace on activators does not affect activation parent relationships.


Setting Up Traps by Hand[edit | edit source]
Some traps can set up some manually, instead of copy/pasting them from TrapsWarehouse. In the next example, two traps will be set off by a single tripwire. Because this is a unique setup, we'll bring objects in from the Render Window and set them up from scratch.
The steps below make use of a powerful new GECK tool called Batch_Assignment. You can read more about it here.
- Place a "TrapTripwire01" near the main entrance of Vault 74 as in fig. 2a
- Place a "TrapGrenadeBunch" as pictured in fig. 2a
- Place a "TrapPitchingMachine01" as pictured in fig. 2a
- Make the tripwire a persistent reference (double-click for properties)
- ctrl+click on the traps to select both of them.
- Hit the "-" key to batch assign as in fig. 2a
- Choose "Set Activate Ref"
- Click on the "Select Reference in Render Window" button
- Double-click on the tripwire when the crosshair turns white -

- Two white/blue arrows now point from the traps to the tripwire, as in fig. 2b
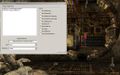
Fig 2a: Using the batch window to assign an Activate Ref to two traps at the same time.
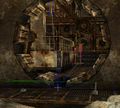
Fig 2b: Blue/White lines verify that the tripwire is the activate parent of both traps.


Mines[edit | edit source]
Mines are unique, and set up differently than other traps. Unlike other traps, which are scripted activators, mines are under the classified as Projectile objects.
- From the Object Window, mines are found under Special Effects>Projectile.
- Type "mine" in the filter to view only mines. These mines are armed and ready to explode. Inactive, lootable mines can be found under Items>Weapon>Weapons>1handMineDrop
- Drag a frag mine from the Object Window to the Render Window.
- With the mine selected, press ctrl-d to make a duplicate of the mine.
- Place a few mines about a foot above the ground, evenly spaced.
- ctrl+click to select all of the floating mines, and then press the Havok button
 on the toolbar.
 - The mines should fall naturally to the ground.
- Deactivate Havok when satisfied with placement.
Mines in Fallout 3 are typically set up not to be detonated by members of the faction that appears to have placed them. To achieve this, mark your mines as owned by the raider faction. To set ownership, double-click on a mine that's placed in the world, and then go to the Ownership tab. Set the faction to "RaiderFaction".
If you want to set ownership on several things at once, use Batch_Assignment, assigned to the "-" hotkey. You can set the ownership on many objects simultaneously this way.
By default, mines trigger when the player is within 100 units, or 160 units in an exterior cell. Frag mines have an explosion radius of 192 units. Keep these numbers in mind when placing mines. Several mines placed too closely together will set each other off, significantly increasing the penalty of tripping any mine in that group.
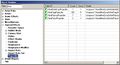
Fig 3a: Finding live mines in the Object Window.
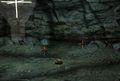
Fig 3b: Use physics to settle placed mines in the world.


Terminals[edit | edit source]
Terminals are found throughout Fallout 3, and can serve many purposes. Terminals that unlock doors/containers and manipulate turrets are provided. This section of the tutorial will show you how to find these generic terminals in the editor, and how to set them up to work in your space.
The first thing you want to do is go into the Object Window, World Objects> Terminal. Type "default" into the filter.
Unlike doors and containers, you cannot set lock difficulty on a terminal's reference. Instead, it is set in the base object. Because of this, the hacking difficulty is indicated in the name of each default terminal base object.
Unlocking Doors and Containers With a Terminal[edit | edit source]
In this example, we will be placing a wall terminal next to a locked door. We'll place some loot behind the door as a reward. Players should always be able to expect some kind of reward after opening a lock.
- Start out with a vault door that leads into a closed off room that we will later fill with loot.
- Set the lock difficulty to Hard, and check the Persistent Reference box on the door.
- Drag a "DefaultUnlockTermWall3Hard" object from the object window into the render window.
- Place the terminal against the wall next to the door and press the "-" key with the terminal selected. This will bring up the batch operation window.
- Select the "Set Linked Ref" option, then "Select reference in render window."
- The cursor will become a red crosshair.

- Move the cursor over the door, it will become white.
- Doubleclick on the door.
- Press the "Do" button.
- You will see the green and yellow Linked Ref arrow pointing from the terminal to the door.
Now that the door is the linked ref of the terminal, the terminal can detect the state of the door(so that it can tell if it's locked or not and give the player proper feedback), and also unlock the door.
Note: You can point this same type of terminal to a locked container for similar unlocking results.
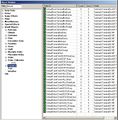
Fig 4a:Finding generic use terminals in the Object Window.
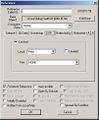
Fig 4b: Setting lock level and persistence on a door reference.
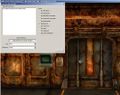
Fig 4c: Using the batch window to set a locked door as the terminal's linked ref.


Manipulating Turrets With Terminals[edit | edit source]
Turrets are set up the same way. Let's put a turret outside the loot room, guarding the entrance. I will take you through common workflow steps to achieve this.
- Find flat section of ceiling to place the turret.
- Place the static object "LvlTurretCeilingMountBase" on the flat surface.
- Make a duplicate of the "LvlTurretCeilingMountBase" object with ctrl+d
- Press ctrl+f to open the find and replace window.
- Swap "LvlTurretCeilingMountBase" with a "crTurretCeiling02" object.
- The turret is probably above the ceiling. Line it up properly with the base.
- Rotate the turret if you want it to point in a certain direction.
- With the turret selected, ctrl+f again and swap this turret out for a "LvlTurretCeiling768Raider" Object.
- This particular turret is set to medium difficulty, but the actual turret difficulty that spawns in will be determined by the turret's leveled difficulty combined with the encounter zone difficulty.
- Next, place a "DefaultTurretTermDESK1Easy" object in the space somewhere. You may need to find a flat surface to place it on, for example an "RCTable01" static object could work.
- Make sure that the turret is a persistent reference
- Make the turret a linked ref of the terminal, just like you did with the door.
- The turret should now be controlled by the terminal.
We placed the "crTurretCeiling02" for visual placement reference only. However, we actually want to use the "LvlTurretCeiling768Raider" object. This is because you can easily change its difficulty, the detection radius is set up, and it will not attack any nearby raiders.
Try to place the terminal in a place of relative safety, ideally after the player has seen the turret, but before it attacks the player. Players are likely to destroy the turret before discovering the terminal. Likewise, if able to frenzy the turret while undetected, the player gets the maximum satisfaction from seeing the turret attack its former masters.
Turrets all have a full 360 turning radius. Avoid placing them too close to walls and other obstacles, even if it seems unlikely that they'll point in that direction, as this can cause animation issues.
Note: These terminals automatically detect the status of their linked turret, and the text will reflect these states.

Fig 5a: Placing a base for the ceiling turret.
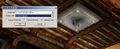
Fig 5b: Using Search and Replace after duplicating the base.

Fig 5c: After using search and replace to swap out a physical turret with a leveled creature turret.
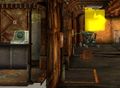
Fig 5d: The control terminal links to the turret.


You're now ready to flesh Vault 74 out with a combination of raiders, traps, and more. With gameplay in place, we're ready to move onto the aesthetics of lighting the space.