Bethsoft Tutorial Clutter
Density of Junk: Cluttering and the GECK[edit | edit source]
You have a layout complete; now what? Once we're happy with the flow of a space and are unlikely to drastically change layout, the time comes to clutter a space.
When cluttering a cell it is good to disable Snap to Grid and Snap to Angle functions. They were very handy to make a layout, but now you will be setting up objects in many different positions and angles that are not on a grid.
There are thousands of objects to place in your space, and it can be daunting to find and place the most appropriate assets, even when you are very familiar with what's available. Luckily, the GECK has a new tool called the object palette that makes placing a wide assortment of items a lot easier.
Before you start, find the folder with GECK.exe. Create a new folder inside that folder named "OPAL".
Download the following object palette files, and place them in the newly-created OPAL folder. These object palette files are user-defined collections of objects that enable a faster, more efficient workflow for tasks like cluttering.
Tutorial Object Palettes:
Cluttering with the Object Palette[edit | edit source]
Clutter Video Tutorial at YouTube
For this tutorial, we'll be making a vault clinic that has been inhabited by raiders. The room on the right in Fig 1a below will be our focus. The rest of Vault 74 will be yours to clutter once you've mastered the basics.
This tutorial will be making extensive use of the object palette tool. Let's take a moment to get familiar with it now.
From the main toolbar, navigate to World> Object Palette Editing. Load the "RustedMedicalClutter" file you downloaded to your "\OPAL" folder earlier. Notice the Palette Objects list populates with several thematic pieces of clutter. Select any piece of clutter in this list. Highlight the render window and use "CTRL+ALT+Left-Click" to place the selected object, the origin of which will snap to the nearest collision surface under your cursor.
December 20, 2008: Several Vista users have reported bugs regarding the GECK crashing when clicking on items in the object palette list and/or when accessing/editing AI packages. A suggested workaround solution is to disable tablet functionality in Vista when using the GECK. Navigate to "Control Panel" -> "Programs" -> "Programs and Features" -> "Turn Windows features on or off". This last link is found in the left-side pane of the "Programs and Features" window. When the "Windows Features" dialog box appears, unselect "Tablet PC Optional Components", click "OK", and restart Vista.
This will allow you to quickly place a variety of clutter objects. You may want to read the more detailed object palette documentation available to learn more about the capabilities of this new GECK feature.
You could also search through the object window and drag objects into the render window the old-fashioned way, but you're encouraged to try the new tool.
Big Clutter[edit | edit source]
The first thing to do is place "big clutter." Big clutter is anything that characters have to walk around, jump over, or that would otherwise affect the navmesh. (Navmesh will be covered in a later tutorial)
When placing big clutter, consider the story of the area. Let's suppose that Vault 74 has been open, exposed to the elements for years, and is now inhabited by raiders. Consider the types of large objects in the vault would have been left over from before the war, as well as what new big objects the raiders would have brought in, as well as how they might have rearranged the old objects from the vault.
History Pass[edit | edit source]
Giving thought to the history of a space will help inform your creative decisions and help create a sense of place and consistency for your players.
Browse the "RustedMedicalClutter", "OfficeBigClutter" and "VaultRusted" palettes for big clutter pieces that are appropriate for your vision of the room. Look for things that identify the space as a clinic, such as operating tables, X-ray panels, desks, and other medical clutter.
Fig 1d below is a first pass on putting in the big, blocking clutter. It doesn't look like much now, but the area is starting to take shape. Lockers and filing cabinets have been added, as well as some vault-style tables and a desk. An operating table and some other medical large clutter pieces have been added as well, to flesh out the identity of this room as a clinic.
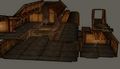
Fig 1a: An empty Vault 74, ready to be filled with stuff.
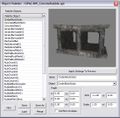
Fig 1b: The object palette with an .opl file loaded and ready to place objects
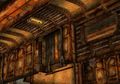
Fig 1c: Signs not only make your space more believable, they also help the player navigate the level
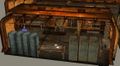
Fig 1d: An example of the Vault 74 medical clinic after a "big clutter" pass.


Raider Pass[edit | edit source]

Continuing to use the object palette, load the "RaiderCampClutter" palette and place big clutter pieces. Several common decoration elements will help unify this area with other raider locations, such as chains, hanging bodies, skeletons in cages.
Feel free to load the "blood" palette and place blood stains on the ground in appropriate places, too. Though blood decals aren't technically big clutter, it's easier to place them early and it adds to the atmosphere.
Personal workflow and techniques vary, but you may wish to move on to navmesh, enemy placement, and general gameplay testing before continuing to smaller, more detailed clutter. This is to minimize the impact of wasted work if you decide to make significant changes to your level based on playthroughs. For the purposes of this tutorial, however, we'll assume that our level flow has been proven and move ahead.
Detail Clutter[edit | edit source]
Once you're happy with the look of your Big Clutter pass, as well as the affect it has on gameplay and flow, the time comes to focus on smaller elements that help flesh out both the visuals and backstory of your level.
Because most detail clutter objects aren't big enough to affect navigation of a space, this stage often comes after navmesh and population in a typical workflow, and is followed by navmesh polish.
In addition to the palette files you've used so far, explore and use the "RandomClutter" .obj to place smaller clutter. Detail clutter has the power to tell a story without a single written word. Looking through the lists of objects, you might get ideas for how to explain what the inhabitants do when you're not around. If it's an area untouched since the war, you can use clutter as a sort of history for the area.
In the Fig 2b below, the orange spots under the hanging corpses are part of the blood dripping FX found in the "blood" palette. Remembering details like dripping blood helps to bring a lot of realism to the scene. Scale the blood drip FX (hold S and click+drag the object) so that the orange spots stay flush against the ground, and the drip source is inside the corpse. You'll need marker geometry toggled on. Try the "M" hotkey if you cannot see the orange markers.
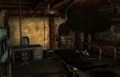
Fig 2a: Adding more objects to the space.
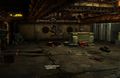
Fig 2b: Clutter outside of the clinic.


There's no "right" way to do a clutter pass. Get creative and have fun. Once you're ready, we'll move on to navmesh, which will enable monsters and NPCs to move about the space.