Difference between revisions of "Bethsoft Tutorial GECK Setup"
imported>Kenshiro000 (tłumaczenie) |
imported>Kenshiro000 |
||
| Line 12: | Line 12: | ||
C:\Program Files\Valve\Steam\steamapps\common\Fallout 3 | C:\Program Files\Valve\Steam\steamapps\common\Fallout 3 | ||
== | == Tworzenie wtyczki == | ||
[[image:geckdatadialog.jpg|250px|right]] | [[image: geckdatadialog.jpg | 250px | right]] | ||
* | * Rozpoczęcie GECK.exe z Fallout 3 katalogu instalacyjnego | ||
* | * Z głównego paska narzędzi, otwartych''Plik> Dane'' | ||
* | * Wybierz'' ' "Fallout3.esm"''' poprzez podwójne kliknięcie i OK, aby załadować | ||
<blockquote> | <blockquote> | ||
Ładowanie. ESM może potrwać kilka minut. Powinniśmy być w stanie wyświetlić ładowanie postępu w dolnej części okna GECK. | |||
</blockquote> | </ blockquote> | ||
* | * Po załadowaniu naciśnij zapisać [[image: gecksave.jpg]] | ||
* | * Z powodu braku aktywnego wtyczki jest ładowany, pojawi się prośba, aby utworzyć nowe wtyczki | ||
* | * Wybierz nazwę nowego pliku *. esp, OK, aby zapisać | ||
<blockquote> | <blockquote> | ||
Jeśli zamierzasz przenieść się do innych samouczków w tej serii, możesz chcieć nazwę wtyczki "Vault74.esp''''". | |||
</blockquote> | </ blockquote> | ||
** | ** Od teraz będzie ustawiona jako swojego aktywnego pliku podczas obciążenia Fallout3.esm | ||
** | ** Zmiany zostaną zapisane na liście aktywnych pliku. To będzie Twój mod podziałowi. | ||
** | ** Kilka wtyczek może być załadowany, ale tylko jeden może być aktywny. | ||
* | * Zamknij GECK przechodząc do''Plik> Zakończ'', a my nauczyć się obciążenie naszej nowej wtyczki (. Plików esp) | ||
==Loading and testing your plugin== | ==Loading and testing your plugin== | ||
Revision as of 10:07, 19 February 2009
== Instalacja / download ==
- Pobierz i zainstaluj najnowszą poprawkę tutaj
- Pobierz GECK tutaj
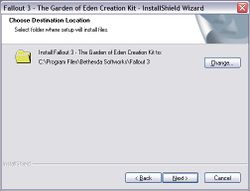
- Zlokalizuj GECK instalatora i uruchom plik.
- Gdy pojawi się monit, upewnij się, że instalacja w katalogu, gdzie swoje mecze GECK detalicznej wersji Fallout 3 jest zainstalowany.
- 'UWAGA': Jeśli używasz Para wersji Fallout 3, właściwej instalacji katalog:
C:\Program Files\Valve\Steam\steamapps\common\Fallout 3
== Tworzenie wtyczki ==
- Rozpoczęcie GECK.exe z Fallout 3 katalogu instalacyjnego
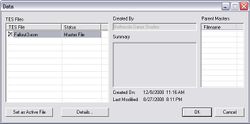
- Z głównego paska narzędzi, otwartychPlik> Dane
- Wybierz ' "Fallout3.esm"' poprzez podwójne kliknięcie i OK, aby załadować
Ładowanie. ESM może potrwać kilka minut. Powinniśmy być w stanie wyświetlić ładowanie postępu w dolnej części okna GECK. </ blockquote>
- Po załadowaniu naciśnij zapisać
- Z powodu braku aktywnego wtyczki jest ładowany, pojawi się prośba, aby utworzyć nowe wtyczki
- Wybierz nazwę nowego pliku *. esp, OK, aby zapisać
Jeśli zamierzasz przenieść się do innych samouczków w tej serii, możesz chcieć nazwę wtyczki "Vault74.esp'". </ blockquote>
- Od teraz będzie ustawiona jako swojego aktywnego pliku podczas obciążenia Fallout3.esm
- Zmiany zostaną zapisane na liście aktywnych pliku. To będzie Twój mod podziałowi.
- Kilka wtyczek może być załadowany, ale tylko jeden może być aktywny.
- Zamknij GECK przechodząc doPlik> Zakończ, a my nauczyć się obciążenie naszej nowej wtyczki (. Plików esp)
Loading and testing your plugin
- Load the Fallout 3 Launcher, but don't hit PLAY.
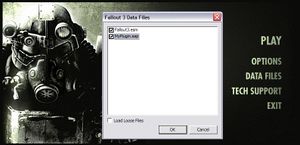
- Choose "Data Files" from the launcher
- The new plugin you created should be available on the next screen, with an empty checkbox. Check it and click OK.
Don't see your .esp file? Verify that you installed the GECK to the same directory as your retail installation of Fallout 3. The file should have been created in a \Data sub-directory in that directory. This is where the launcher looks for data files.
Under Vista, if you are not running as Administrator, the data file may have been created in a shadow directory (with a name like "\Users\Me\AppData\Local\VirtualStore\Program Files\Bethesda Softworks\Fallout3\Data"), where it is visible to the GECK but not to the Fallout3 launcher. You can avoid this by always running the GECK as Administrator or by modifying the USERS permissions for the Fallout 3 directory ONCE.
- Fallout 3 will now load your plugin file when the game is launched.
There's not much point to running the game with your new plugin yet, however, since there's nothing in it. Let's exit the launcher, fire up the GECK again and get started building our first Vault location.


