Bethsoft Tutorial GECK Setup
Please Note: The official wiki is no longer being maintained by the community[edit source]
The modding community for Fallout 3 and Fallout New Vegas has created its own wiki due to onerous and painful captcha requirements for every edit.
The active wiki contributors have moved to the new wiki -- for the most current information, visit:
http://geckwiki.com[edit source]
Download[edit | edit source]
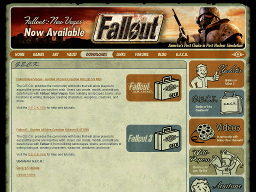
Fallout 3 and Fallout: New Vegas use slightly different versions of the GECK, so make sure you download the correct version. You can download the GECK from the Official Site, or via direct download below.
Fallout 3 GECK and Patch[edit | edit source]
As of 26 May 2009, the GECK has been patched to version 1.5
Fallout: New Vegas GECK[edit | edit source]
- Download the Fallout: New Vegas GECK here.
Install[edit | edit source]
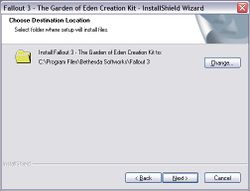
- Locate the GECK installer and run the file.
- When prompted, be sure that the installation directory for the GECK matches where your retail version of Fallout 3 or Fallout: New Vegas is installed.
- NOTE: If you are using the Steam version of Fallout 3\FONV, the proper installation directory should be something like:
C:\Program Files\Valve\Steam\steamapps\common\Fallout 3
or
C:\Program Files\Valve\Steam\steamapps\common\Fallout New Vegas
- If you are using a 64bit system, these may be located in
C:\Program Files(x86)\...
- MISSING .DLL: If you get a message like this
This application has failed to start because libvorbisfile.dll was not found. Re-installing the application may fix this problem.
then it is in the wrong folder. Libvorbisfile.dll is located in the FO3/FONV directory.
- NOTE: If you are using Windows Vista or Windows 7 it is recommended that you install FO3/FONV and the matching versions of the Geck in a folder other than Program Files or Program Files (x86). These folders are protected by the operating system and require you to take additional steps when creating and using mods. If you have already installed them into one of these folders, either uninstall them and reinstall them into a location like C:\Games or C:\Fallout, or, when using the Geck, always run it as the administrator. See the note below under Loading and Testing Your Plugin for more information.
- WARNING: The G.E.C.K. is for modding the PC version only. You cannot use it to mod the X-Box 360 or PS3 console versions of the game.
Creating your plugin[edit | edit source]
- Launch GECK.exe from your Fallout 3/FONV installation directory
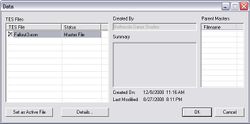
- From the main toolbar, open File>Data
- Select "Fallout3.esm" or "FalloutNV.esm" by double clicking it and OK to load
Loading the .esm may take several minutes. You should be able to view the loading progress at the bottom of the GECK window.
From here on, unless stated otherwise, assume that when we talk about Fallout 3, we are talking about either version of the game. Not all features may be available in both versions of the editor, so there may be some discrepancies when adapting instructions from one version to the other. If you come across any discrepancies, you can help out by updating the wiki accordingly.
- Because no active plugin is loaded, you'll be prompted to create a new plugin
- Choose a name for your new *.esp file, OK to save
If you're planning to move on to the other tutorials in this series, you might want to name your plugin "Vault74.esp".
- From now on, you will set this as your active file when you load Fallout3.esm
- Your changes will be saved to your active file. This will be your mod distributable.
- Multiple plugins may be loaded, but only one may be active.
- Close the GECK by going to File>Exit, and we'll learn how to load our new plugin (.esp file)
Loading and testing your plugin[edit | edit source]
- Load the Fallout 3 Launcher, but don't hit PLAY.
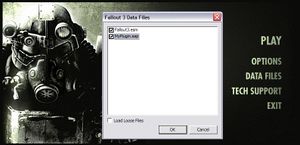
- Choose "Data Files" from the launcher
- The new plugin you created should be available on the next screen, with an empty checkbox. Check it and click OK.
Don't see your .esp file? Verify that you installed the GECK to the same directory as your retail installation of Fallout 3. The file should have been created in a \Data sub-directory in that directory. This is where the launcher looks for data files.
Under Vista, if you are not running as Administrator, the data file may have been created in a shadow directory (with a name like "\Users\Me\AppData\Local\VirtualStore\Program Files\Bethesda Softworks\Fallout3\Data"), where it is visible to the GECK but not to the Fallout3 launcher. You can avoid this by always running the GECK as Administrator or by modifying the USERS permissions for the Fallout 3 directory ONCE.
- Fallout 3 will now load your plugin file when the game is launched.
There's not much point to running the game with your new plugin yet, however, since there's nothing in it. Let's exit the launcher, fire up the GECK again and get started building our first Vault location.


