Difference between revisions of "Bethsoft Tutorial Layout"
imported>Henning |
imported>Henning m (→Making a Hallway: Fixed button order for 'Move object in X/Y/Z') |
||
| Line 231: | Line 231: | ||
'''Duplicate''' "Ctrl-D" | '''Duplicate''' "Ctrl-D" | ||
'''Search & Replace''' "Ctrl-F" | '''Search & Replace''' "Ctrl-F" | ||
'''Move Object in X/Y/Z Axis only''' " | '''Move Object in X/Y/Z Axis only''' "X/Y/Z" | ||
'''Toggle perspective views''' "C" | '''Toggle perspective views''' "C" | ||
'''Toggle orhtographic view''' "0" (zero) | '''Toggle orhtographic view''' "0" (zero) | ||
Revision as of 14:57, 26 December 2009
Overview
The literal foundation of any level is layout. Layout is the most fundamental way we create flow within a gameplay space. Fallout 3's layouts are primarily built with kits, a set of interlocking pieces of art that can be snapped together to build a seamless environment. This tutorial will introduce you to layout with the Vault kit. While every kit is unique, they all share the same basic naming conventions and functionality, which this tutorial will help you learn.
Creating a New Cell
Several videos are available at The Bethesda Game Studios YouTube page. Everything you need to know will be taught without them, and you may remain on this site. However, you may find them useful, particularly if you're struggling with any concepts that are better illustrated visually.
Layout Video Tutorial (part 1) at YouTube
Duplicating and Re-Naming an Existing Cell
The first thing we need to do is create a new interior cell. The best way to make a new cell is to duplicate an existing one. To do this, make sure the "Cell_View_Window" has "Interiors" selected in its "World Space" drop-down box. Now find "Vault108a" in the list of cells.
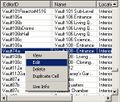
To duplicate this cell, right click on it and select "Duplicate Cell."
When duplicating a cell, it is best to pick one that has the same theme and kit as the cell you'd like to make. This is helpful because when you duplicate a cell, its Ambient Light, Fog, and ImageSpace settings all get duplicated too.
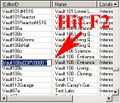
Notice that the newly duplicated cell has been made below the original, and has an EditorID of "Vault108aCOPY0000" Now let's change the EditorID.
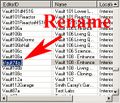
To change the EditorID, either select the Cell and hit "F2", or click the already highlighted Cell one more time. This will allow you to rename the EditorID. Change it to Vault74a.
Now that we've established our cell and changed its EditorID, let's change the name as it will appear in-game.
"Cell Name" is the name that the player will see while viewing the Local Map or a door leading to this cell. The cell name also appears on saved games in the load menu.
In order to do this we will need to right click on the Vault74a cell and select "Edit". This dialog can also be found from the main toolbar via World>Cells.
After you select "Edit," the "Cell" Properties window will come up. Click on the "Interior Data" tab, then change the "Vault 108 - Entrance" to "Vault 74". Hit "OK".
Deleting a Cell's Contents
Before we can begin using our new cell, we need to remove the unwanted contents of the cell we've duplicated it from. With your new "Vault74a" cell loaded, click on the top-most column in the Object List, then press "Shift+End", or scroll down and "shift-click" on the bottom object. This will select all of the Objects in the list. Press "Del" to delete all of the objects, or right click on one of the highlighted objects and click "Delete". A message box will pop up; confirm your deletion by pressing "Yes".
It's possible to have a cell highlighted in the Cell View window while another cell is loaded in the Render window. To make certain you don't accidentally delete objects from the wrong cell, verify that "Vault74a" appears in the text bar at the top of the Render Window.
You will notice that everything was deleted except for the navmesh. There is a special way to get rid of the navmesh in a cell. With Vault 74 loaded, navigate to Navmesh>Remove Cell Navmeshes from the main toolbar. You should notice the navmesh object in the Objects List no longer appears, leaving the list completely empty.
Your cell contents and navmesh may not appear to have been deleted until you load another cell and return to this one.
The first thing we want to do in our newly created cell is to drop in some Kit pieces. We will be using the Ruined Vault kit pieces for this tutorial. Let's drop in a couple of kit pieces and learn how to work with them.
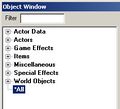
The kit pieces we will be using for this are the Vault Ruined Hall Small pieces. To find these pieces, navigate the "Object Window" tree to "World Objects>Static>Dungeons>VaultRuined>HallSmall", or just follow the picture.
Grid and Angle Snapping
Before we drop in some pieces, let's learn about one of the most important buttons in the editor.
This is the "Snap to Grid" button:![]() This button toggles grid snapping on and off. This makes sure that when you move an object around the cell, it snaps at unit intervals of 256, 128, 64, or whatever else you specify. We will leave Grid Snapping on for the remainder of this tutorial. You will need to change your snap settings from time to time, depending on what pieces you are using. The hotkey for this button is "Q". (The "Render Window" must be selected for this hotkey to work.)Take a moment now to ensure the button is depressed and snapping is active.
This button toggles grid snapping on and off. This makes sure that when you move an object around the cell, it snaps at unit intervals of 256, 128, 64, or whatever else you specify. We will leave Grid Snapping on for the remainder of this tutorial. You will need to change your snap settings from time to time, depending on what pieces you are using. The hotkey for this button is "Q". (The "Render Window" must be selected for this hotkey to work.)Take a moment now to ensure the button is depressed and snapping is active.
We will now set the grid settings. Right-click on the render window to bring up the options, then click Render Window Properties. The next step is to click the Movement tab. For most of this tutorial, a 128 grid snap should be fine. There may be times when you need to drop the grid snap down to make certain pieces fit.
The GECK uses a proprietary units system which is neither metric or U.S. This units system snaps cleanly at units of eight. When dealing with snapping, a good rule of thumb is to work at the largest snap setting available. Most Fallout 3 kits work well with a snap setting of 128 units.
A good thing to remember while you're getting used to units - the player is 128 units tall, or about six feet.
Another critical tool is the "Snap to Angle" ![]() button. This button toggles rotational snapping. This makes sure that when you rotate an object it snaps to degrees of 15, 45, or whatever you set it to. Again, make sure this is on for the rest of this tutorial. You can leave this setting at 45 now and for the remainder of the tutorial series. The hotkey for this button is "Ctrl-Q". (The "Render Window" must be selected.)
button. This button toggles rotational snapping. This makes sure that when you rotate an object it snaps to degrees of 15, 45, or whatever you set it to. Again, make sure this is on for the rest of this tutorial. You can leave this setting at 45 now and for the remainder of the tutorial series. The hotkey for this button is "Ctrl-Q". (The "Render Window" must be selected.)
The GECK measures rotation in degrees between 0-360. While you can enter any valid rotational snap setting, it is not recommended that you use a snap setting below 90 when placing kit pieces, to avoid gaps in level geometry.
The importance of good snapping etiquette cannot be overstated. Sloppy placement, especially at these early stages, can result in a myriad of problems, such as overlapping polygon surfaces and gaps in level geometry. These problems can be especially frustrating to debug and fix, so focus on a clean layout now and save yourself the headache later.
To use almost any hotkey in the G.E.C.K., you must first make sure the "Render Window" is selected. Do this by either clicking the top of the "Render Window" or clicking inside of it once with your mouse. This includes the "Ctrl-S" Save hotkey.
Hotkey Quick Reference:"Snap to Grid" "Q"
"Snap to Angle" "Ctrl-Q"
Using the 3D Camera
Make sure "Snap to Grid" and "Snap to Angle" are on and drag a "VHallSm1WayR01" piece into the render window from the Object List. Now that we have an object in the render window we can learn to move it around, along with the camera. Also, make sure the lights are turned on by pressing ![]() , or using the hotkey "A".
, or using the hotkey "A".
A brief note on data in the GECK: You've just created a "Reference" of the Base Object VHallSm1WayR01. The difference between a Base Object and a Reference to it is an important distinction you'll come to understand. When we modify a Base Object, every Reference of that object in the game will be affected. Base Objects are listed in the Object_Window, while the Reference objects currently loaded are viewable in the Cell_View_Window.
To Zoom, either use the "Scroll Wheel" on your mouse or hold "V" and move your mouse forward or backwards. "V" is a smooth zoom, useful for precise motions, while scrolling is practical for regular use.
To Rotate the Camera, hold down "Shift" and move your mouse. This will rotate your view around the currently selected object. If nothing is selected it will turn the camera in place.
To Pan the Camera up, down, left, or right, hold either the "Space Bar" or click & hold the "Middle Mouse Button", moving your mouse to pan.
If camera controls feels too rapid or sluggish, you can customize these speeds. "Right Click" within the Render Window while your cursor is not above any selectable objects, and select "Properties".
Choose the "Movement" tab and set your properties to your liking. You may want to go back and forth and get a get a feel for each setting. Remember where to find these settings, as you may wish to customize them in the future based on your current task.
There is an experimental fly-cam feature in the GECK. To activate fly-cam, press "~". The WASD keys can be used for movement, and your mouse motions will now control your camera point of view from a first-person perspective. This view can be disorienting. Simply press "~" to return to normal camera controls at any time.
You can also access the Preferences window by clicking "File/Preferences" or clicking the
Button, or by navigating to File>Preferences from the main toolbar.
Hotkey Quick Reference:"Turn lights On/Off" "A" Zoom "V" Rotate "Shift" Pan "Space" Toggle fly-cam "~"
Making a Hallway
Layout Video Tutorial (part 2) at YouTube
Now that we have an object "VHallSm1WayR01" in the render window, and know how to navigate our cell, lets make a hallway. First, select our Hallway piece in the render window and hit "T". This will center our camera over top of the selected object. Now (with "Snap to Angle" ![]() ) rotate the piece 90 degrees by Right Clicking and dragging while your cursor is over it. The object should now face left to right, as pictured below.
) rotate the piece 90 degrees by Right Clicking and dragging while your cursor is over it. The object should now face left to right, as pictured below.
By default, the top of your screen is north when using T to center/zoom your view over the current selection. It is possible to override this with a special NorthMarker object found under the statics heading.
With the new Hall section selected, press "Ctrl-D" to duplicate it. This makes an exact clone of the selected object(s). You may not realize at first that you've created a new object(s) because of overlap. However; if you look in the Object List, you will notice two "VHallSm1WayR01" hallway pieces. Select and Drag the newly made hallway piece just to the left of the current piece. Make sure you have "Snap to Grid" ![]() on, which will ensure a precise tile. Check against the second image below to see how the snapped pieces should look.
on, which will ensure a precise tile. Check against the second image below to see how the snapped pieces should look.
A small, convenient change from the Elder Scrolls CS when duplicating objects: by default the new object will be selected, not the original object. This becomes an important detail when duplicating persistent references that may be used in scripts or quests.
Let's add a corner just to the left of the new piece we added. Do this just like before. Select the piece, hit "Ctrl-D" the drag the new object to the until it's snapped onto the end of the previous piece. This will give you three hallway pieces in a row, as pictured below.
Now select the left most piece and hit "Ctrl-F", this will bring up the "Search & Replace" window. In the "Replace with" drop-down box select "VHallSm2WayR01" and hit enter. This will replace the selected hallway piece with a corner piece.
Now rotate the corner piece so it faces up. Remember, use Right Click and drag to rotate an object. Also, make sure "Snap to Angle" ![]() is on. Your Cell should now look like this.
is on. Your Cell should now look like this.
Now is a good time to learn about the naming convention of this kit. Lets analyze the first hallway piece we added, VHallSm1WayR01:
| Naming Abbrev. | Meaning |
| V | Vault |
| Hall | Hall |
| Sm | Small |
| 1way | Straight Section |
| R | Rusted Version |
| 01 | First Variation |
The corner piece has the name "VHallSm2WayR01". The only difference is the "2way". This indicates that this is a basic corner piece. Three-way and Four-way intersections would be "3way" and "4way", respectively.
Until you learn this and the other available kits' naming conventions, it may be useful to work with the Preview Window open, dragging pieces in from the Object Window manually. The workflow described here is preferred by level designers at Bethesda for its speed and efficiency, but requires strong familiarity with the kits and their naming conventions.
Let's end the hallway just beyond the corner. The piece we put here will end the hall with a doorway so we can continue to another room or hallway. We'll do this the same way we made the other pieces. Duplicate the corner piece with "Ctrl-D", then move the new piece toward the open end of the corner piece. Use "Ctrl-F" and replace the piece with "VHallSmEndExSmR01". Compare your scene to the first image below.
Now lets add some stairs on the open end of the hallway. As before, select an existing piece and duplicate with "Ctrl-D". With the new piece selected, hit "Ctrl-F" and replace the current piece with "VHallSmStairsR01". Move the stairs into position onto the open end of the hallway and check your work against the second image below.
Most kits snap and tile on the vertical Z axis as well as the XY axes. This allows the creation of overlapping areas without clipping.
Now we'll add a corner piece at the top of the stairs. We could duplicate the stairs, move them, then replace them with the corner piece. Instead, we will just use the already existing corner piece we have in our cell. Just select the corner piece "VHallSm2WayR01", use "Ctrl-D" and move it to the other end of the stairs. Now, we have to move the corner piece up to actually connect to the top of the stairs. This is done by holding down "Z" while moving the object. While "Z" is being held down the object can only be moved in the "Z" axis, which is up and down.
You can lock which axis you move or rotate an object on by holding down either "Z", "X", or "Y".
The GECK features multiple pre-set views that can be cycled with the hotkey "C", as well as an orthographic view toggled with the zero hotkey. Try switching to orthographic view and cycling the pre-set views now to verify that your pieces are snapped correctly, leaving no gaps.
Lets cap this open end the same as we did the other. Just duplicate the existing "VHallSmEndExSmR01" piece and move it to this corner piece. Remember to use "Z" to move the object up into position. Your cell should now look like this.
Lets wrap up this hallway by filling in those doorways. There are two ways we can go about this. The first would be to navigate the Object Window hierarchy. The doors we will be using are found under World Objects>Door>Dungeons>VaultRuined>VDoorSlidingRR001.
The above technique is a good place to begin, especially before you know what pieces are available. The second method we're about to discuss assumes you are somewhat familiar with the naming conventions of the object you're looking for, and are less concerned about the object type.
For the second technique, we will be using two features new to the GECK. These are the "Filter" text box in the "Object Window" and the "*All" category. Filtering makes finding specific objects very easy when you have an idea what you're looking for. First, let's make sure we are looking through all of the objects in the game. In order to do that collapse the whole tree so that it looks like this, and you have "*All" selected at the bottom.
GECK filter windows accept * wildcard characters. This wildcard tells the filter you don't care what characters appear in place of the asterix. For example, I can input "ghoul" in the Object Window, which yields a large number of results. To narrow this search down, I can modify my input to "fer*ghoul", which narrows the results down to those in which the letters "fer" appear anywhere in the base ID prior to the letters "ghoul".
Now, with "All" selected type "vdoorsliding". The "VDoorSlidingRR001" is what we are looking for. Since we don't have a "Vault74" door this will have to do for now.
Because there are so many objects in Fallout 3, the *All category may load slowly when the filter field is blank.
Drag the "VDoorSlidingRR001" door into your cell. Then move it into one of the door frames. Once you have it in place duplicate it and move it into the other door frame. Your cell should now look like the third image below.
The rest of this tutorial will mostly be pictures showing the layouts of the pieces. There will be some places I explain how things work, but mostly you will be building based off of the pictures. You can make some of your own layout changes if you like, but keep in mind that the rest of the tutorials after this point are based off of the layout of this one.
Hotkey Quick Reference:"Turn lights On/Off" "A" Top View "T" Duplicate "Ctrl-D" Search & Replace "Ctrl-F" Move Object in X/Y/Z Axis only "X/Y/Z" Toggle perspective views "C" Toggle orhtographic view "0" (zero)
Laying out the Rest of the Cell
| Function | Hotkey | Toolbar Button |
| Snap to Grid | "Q" | |
|---|---|---|
| Snap to Angle | "Ctrl-Q" | |
| Toggle Lights | "A" | |
| Duplicate Object | "Ctrl-D" | |
| Find/Replace Object | "Ctrl-F" | |
| Top View | "T" |
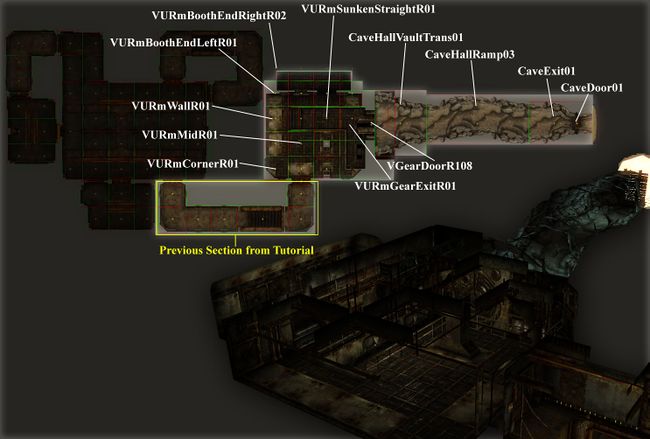
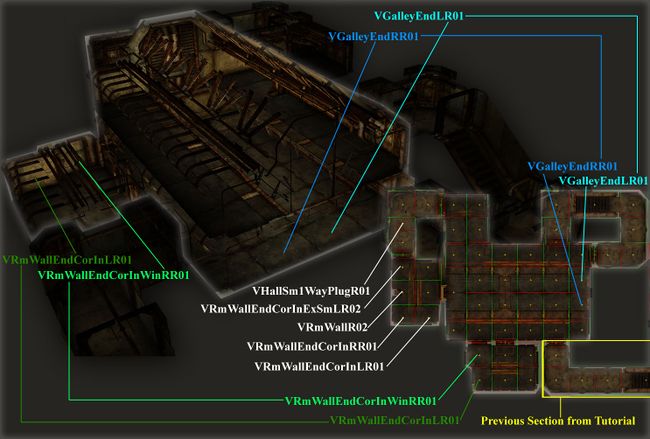
Lets dig into the rest of this layout. Using the following pictures as reference you'll be able to build out the highlighted areas. Keep in mind that not all of the pieces are labeled. Using what you have learned you should be able to find those pieces based on the names of the labeled ones.
As you construct larger areas you will find it useful to select several kit pieces at once, duplicate, and rotate them. You can select multiple pieces by holding the Ctrl key down while clicking or dragging to select additional segments.
Remember that most kit pieces use helpful naming conventions. Here are some more examples of naming components found in the Vault kits:
| Naming Abbrev. | Meaning |
| V | Vault |
| U | Utility |
| Rm | Room |
| Hall | Hall |
| Sm | Small |
| Wall | Wall section (room) |
| Mid | Floor Section (room) |
| 2way | Corner Section |
| R | Rusted Version |
| 01 | First Variation |
If you want to get a better idea of what your cell looks like, you can drop in a few temp lights to give the scene some depth. You can find temp lights in the Object Window under World Objects>Light>TempLight01. We'll cover lighting in more depth in the Lighting Tutorial later in this tutorial series.
If you don't want to do the guess work the unmarked door node is VURmWallExSmR01, VURmBoothWallWindowR01 works well for the booth wall, stairs are VURmSunkenStairsR01. Also, To get the Vault door to line up set the grid snap to 64. For the Cave door use 32.
The galley pieces consist of the tiles running down the center of the galley. The outside pieces, both first and second floor, consist of the same room pieces you used to create the vault rooms.
Sometimes two different rooms that you want to connect are on a different grid. In this cell we were working on a 256 grid, up until we connected to the last room (the Overseers Office). This room is on a 128 grid so that the window can look out over the galley. Using a regular hall piece here wouldn't work. So, we need to use a "Plug Piece". In this case, we need to use "VHallSm1WayPlugR01".
Test your Layout in Fallout 3
Now that you've got a plugin with something to look at, let's test it in the game.
Start the Fallout 3 launcher and choose the "Data Files" option. You should see your .esp in the list of files that pops up. Check the box next to it and click OK.
If the launcher is giving you any trouble, you can create a new file in your main Fallout 3 directory called "custom.ini". This file will override any matching settings in "Fallout_default.ini". To force the game to load our plugin, we can add the line:
STestFile2=vault74.esp
in that file, save and close. Replace vault74.esp with the name of your plugin if it is different. Note that this won't do anything if the matching esp file isn't in your Fallout 3/Data directory.
Once you've loaded the game, access the console by pressing "~" (tilde). Use the console command "COC Vault74a" to move the player to your new cell.
The GECK includes a special object called a "COCmarker". Place this object where you want to appear when using the COC command. Only one of these special markers may be placed per cell.
It's a good idea to save your plugin and test in the game frequently.
Now that we've got the basic layout of our Vault completed lets move on to Cluttering it.


