Category:Landscape
Used to edit the local landscape in the render window. To make large-scale changes to the landscape mesh, use the Heightmap Editor.
To access this window, use the "H" hotkey from the Render Window. Only useful in exterior cells.
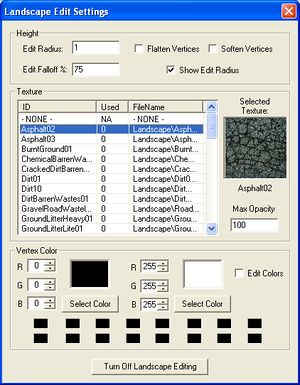
Landscape Editor SettingsEdit
- Height
- Edit Radius: Controls the size of the editing brush. Range: 1-15.
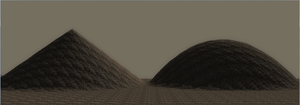
- Edit Falloff %: Changes the curve of the slope when raising or lowering land with the editing brush. Range: 1-100.
- Flatten Vertices: When checked; Brush will flatten terrain.
- Soften Vertices: When checked; Brush will soften terrain variation.
- Show Edit Radius: When checked; Brush Radius appears in the Render Window.
- Texture
- Texture List: List of available Textures by ID and Filename
To add or change textures, go the the Object Window. Textures are under Miscellaneous/Land Texture. - Selected Texture: Preview of currently selected texture.
- Max Opacity: Controls strength of brush when painting texture.
- Applying Textures: Right click on the terrain to apply the selected texture.
- Texture List: List of available Textures by ID and Filename
- Vertex Color:
- RGB: Manual entry of Left/Right-click Shading colors.
- Select Color: Select shading colors from palette menu.
- Rows of color Swatches: Two rows of swatches to store custom colors.
Landscape Editing ModeEdit
Use the left mouse button to edit the terrain mesh, and the right mouse button to paint the selected texture.
Vertex Color Editing ModeEdit
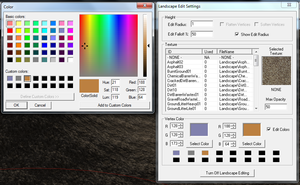
When you check the Edit Colors box (or press the "E" hotkey) you will enter vertex painting mode. In vertex painting mode, normal editing is blocked and the mouse is used instead to paint the vertices of the terrain with one of the RGB colors selected in the Vertex Color group. Press and hold the left mouse button to paint with the color on the left; use the right mouse button to paint with the color on the right. The default colors are black and white, but these may be changed by using the Select Color button to pick a color from the Windows color picker, or by entering numbers directly into the R, G, B fields, either by typing them in or by using the rolling keys. Vertex Painting is used primarily to add shadows to the ground below static objects (e.g. darken the area around a building or a stone) but it may also be used to provide subtle color variation to landscape to break up tiling.
Adding Custom ColorsEdit
To add colors to the rows of color swatches below the left and right color selections, click one of the Select Color buttons to open the Windows color picker. In the color picker, select the swatch you would like to add a color to. Pick a color and click the Add to Custom Colors button in the lower right of the color picker. Click Ok to close the dialog. Your new color will appear in the same swatch in the Landscape editor. You may make a custom color your current selection by clicking on one of the swatches. Left-clicking selects the color for the left mouse button. Right-clicking selects it for the right mouse button.
Keyboard ShortcutsEdit
- Bracket keys ([ and ]) adjust edit brush size up and down, in increments of 1.
- E key cycles between height map editing and color editing modes.
- Shift+W to toggle water on and off. Useful for editing shorelines.
Common IssuesEdit
These are some of the most common issues you will encounter when using the Landscape editor.
Editor won't let you alter the terrainEdit
Make sure that the Edit Colors checkbox is unchecked. If it is, it may be that you are trying to edit one of the outer cells in the Render window. By default, the Geck renders a 5x5 grid of cells in the Render window. When using the Landscape editor, the Geck will not allow you to make edits to any of the cells around the outside edge. This is to prevent unintentional edits and errors from occurring. (Note that changes to inner cells may still bleed over to these outer cells but will not affect cells that aren't currently being rendered.) To see which cell you are trying to edit, turn on cell borders ("B"). To edit this cell, move the cell closer to the center of the Render window. The window will 'flash' as it renders the new set of cells. You should now be able to edit the cell.
Render window won't render new cells when panningEdit
When using the Landscape editor, you will find that, at times, the Render window will not render new cells when you pan, making it impossible to edit nearby cells. To fix this, close the Landscape editor ("H") and left-click the terrain mesh to select it (not an object located on the mesh!). If you have an object selected in the Render window before turning on landscape editing, the Render window will not allow you to pan to new cells.
Note that this fact can be turned to your advantage: if you want to get a look at your landscape from a distance, select an object in the Render window and switch to landscape editing mode ("H"). The cells will no longer be unloaded when you pan away from the active cells. The normal behavior is for these cells to be unloaded and new cells rendered (made active).
Editor won't let you paint new landscape texturesEdit
You may find that the editor will allow you to alter the terrain mesh, but not paint a new landscape texture, or that the new texture will suddenly stop at an invisible border. If this is the case, you have too many landscape textures painted on the current quad.
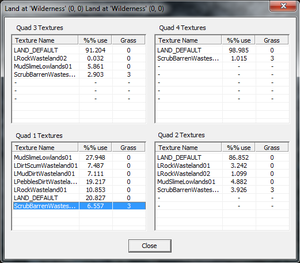
Individual cells are divided into four quads. Each quad may only have seven textures associated with it (Oblivion landscapes support up to nine textures). Once you have reached this limit, the editor will no longer allow you to add more. You may view which textures are currently painted to your landscape by pulling up the Landscape Texture Viewer, which is done by pressing "I". (Note that the viewer will show you the textures for the currently selected cell, so make sure you have the correct cell active.) The texture viewer will show you a breakdown of textures by cell quad and the corresponding percentage of the quad that is painted with a particular texture.
If you have used all of the texture slots but would like to change one of the textures, select the texture you would like to remove in the Texture Viewer and press the Delete key on your keyboard. Do not delete the first texture in the list: this has been known to cause cell data to become corrupted. (Needs verification that this still applies to the Geck.) If you want to remove the first texture in the list, paint with a different texture until the first texture has a lower percentage and then remove it from lower in the list. (You will have to close and reopen the texture viewer to update it with these changes.)


